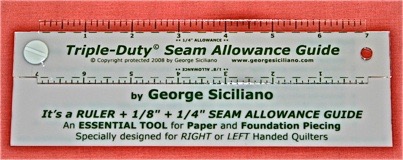
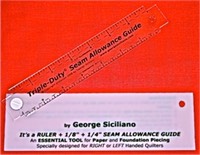
This seam allowance guide was years in the developing and perfecting stage. The ruler portion of the tool is made from heavy duty acrylic suitable for use with a rotary cutter and with normal use will last for many many years. The threaded hinge is easily removed, with a coin, so that the ruler can be changed from side to side (for left handed or right handed quilters) and or from 1/4” to 1/8” and back with extreme ease.
The guide (bottom portion) itself is also made of heavy duty acrylic. A complete list of step by step instructions are included on the back of the guide. (they will not get lost). In the last 8 years 5 different prototypes of this guide were used exclusively by all of my workshop students. All of their suggestions were considered and improvements were made. You could say this tool was designed by over 3000 quilters.
The instructions on the back of this guide is exactly and precisely the technique I use when making all of my quilts from miniatures to full sized bed quilts.
Once you start to use this tool you’ll wonder how you were able to do without it.
Here is a web page special for you. Purchase any of my published patterns with the fabric pack and I will reduce the price of either the 8" or 12" Triple Duty Seam Allowance Guide" by $4.00.
Instructions and Video
Just a quick note, you will be using my "patent pending" "Triple Duty Seam Allowance Guide". There is nothing like it on the market. Keep in mind that as you begin the construction process, you will be creating the seam allowance for the next piece you will be stitching- NOT the one you just completed.
- Getting Started. (For the first piece only), cut a piece of fabric at least 1/2"' larger than the area it will be covering (the first patch). Pin this fabric to the underside of the foundation making sure the pin will not interfere with the sewing of the first line. Remove this pin after seeing this patch.
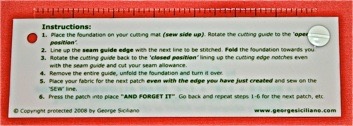
- Place the foundation on your cutting mat sew side up, with the first line to be stitched facing you. Rotate your seam allowance guide to the open position.
- Line up the seam guide edge (that's the white section of your guide) with the NEXT line to be stitched, and fold the foundation towards you.
- Rotate the cutting guide (ruler part) back to the closed position. Notice there are notches on both sides of the cutting guide. When you bring the guide to the "closed position", be sure to line up the edge of this notch with the seam guide. This will ensure a nice straight cut of either the 1/8" or 1/4".
- Holding everything down firmly, cut along the "cutting guide". (ruler)
NEVER CUT ALONG THE SEAM GUIDE (the white part)!
- Remove the entire guide, turn the foundation over and place the next piece of fabric even with the line you have just created. Slide the foundation under your presser foot and stitch along the sew line.
- After stitching, remove the block from under the presser foot, cut off all of the loose threads and finger press the patch up to the stitches you've just sewn. Remember, once you press the patch into position, you're done with that patch. Turn the foundation so the next line to be sewn is facing you.
- Now go back and follow instructions 2 through 7 for each of the rest of the patches for this block.
A condensed version of these instructions are on the back side of your guide.
If you have any questions at all, please contact me.
Here are some handy rules with regards to paper and foundation piecing.
1. Always sew on the "printed side" of your foundation. (the easy to see side, the brightest)
2. Always sew in numerical sequence. Do not "ad-lib". It's already preplaned for you.
3. Always press the completed patch up to the stitches. Nice and tight.
4. Always e-mail a picture of your finished project. We love seeing your work.
5. For goodness sake HAVE FUN.